Sunday, March 30, 2014

Upload/Access a File to network folder in asp.net

In my previous POST I had shown how to upload file in ASP.NET using the FileUpload control.

There might me lot of cases where your web server might no hold the 'n' number of files uploaded into the server. At this time your network guys may ask you to upload the file into a data server where you have lot of space. So, basically instead of storing it into the same server you will be forced to store it into a network folder.

Storing into a network folder is not a big deal. But when you are in a domain and your company have lot of security policies, then you might get into troubles uploading the file into the network folder.

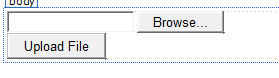
First let me tell you how to show a network folder inside the FileUpload control.
Steps:-
1) Create a folder which is shared among Everyone to read/write let us say the path is \\smilu-pc\NetworkFolder\
2) Add the network path into the Fileupload's SaveAs method as shown below.


protected void UploadFileButton_Click(object sender, EventArgs e)
{
  FileUploadDocuments.SaveAs(@"\\smilu-pc\\NetworkFolder\\" + FileUploadDocuments.FileName);
}

If you have network access to this folder to write then you must be able to upload the files into it.

Now, If you don't have network access to these folders once you publish the website, you might get errors and the file may not be uploaded into the folder.


The above should not be the case always.
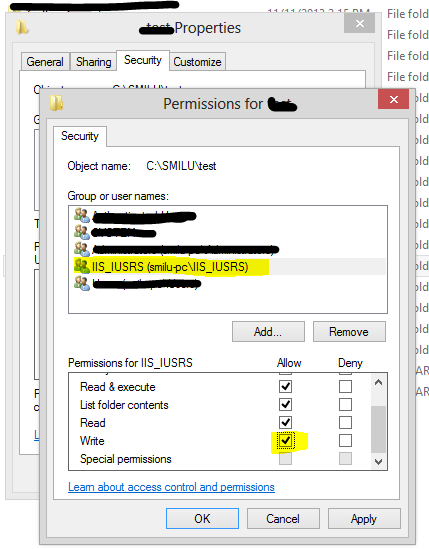
Your companies security policy will not allow you to share the folder for "Everyone" for writing/reading. So, It will be given to specific users. Here are some steps which will really help you to do these actions.

The most common error which you will find is written below

Exceptions:
System.UnauthorizedAccessException: Access to the path ' \\smilu-pc\NetworkFolder\filename.txt' is denied

When you try to upload the file the above exceptions might appear to you. And you will be struggling giving permissions to folder. When you run locally this will work very smoothly. But when you run this from webserver it will always throw the above error.

So, How can I solve this.
The best way to solve this is Identity Impersonation. You can look MSDN for its descriptions.
I'll give you a basic idea of it.
By default, Impersonation is disabled by asp.net and all the applications running in asp.net will not be having identity impersonation.
Identity Impersonation allows the Application to get authorized by a specific username and password when accessing the network folders or while doing some activities on the machines hence allowing it to work smoothly.

How to enable Identity Impersonation?

You can enable the Identity Impersonation in two ways.
1) Through web.config.
Adding the data into the Web.config is the best and the easiest way for working with Impersonation.

 <identity impersonate="true" userName="domain\smilu" password="password"/>

Writing this code into your system.web section of your web.config file will allow you to safely work with your application now. The user SMILU must be having access to the folder to write/read whatever is needed. The same user should also be part of the webserver's too(This I'm writing because I faced lot of issues when the user was not a part of my webserver)

If all the things are taken care of, which I have written above, you can run your application and you can see the Files getting saved into the network folder safely.

Hey see this, I can see your password now. Haha, now let me hack your machine.
Oops!! This is a major issue when you are working with Impersonation since the username and password is visible to others.
So, how can I solve this problem.
You can solve this in two ways

  • Encrypting identity section in web.config
  • Impersonation thorough code behind in asp.net
1) ENCRYPTING IDENTITY SECTION IN WEB.CONFIG
You are not joking right? Can we really encrypt the identity section in web.config??

Yes, Its not only identity section you can encrypt any section you need like Connection strings, app settings, identity section using asp.net and the asp.net will decrypt it for you.

How can you Encrypt a data in Web.config in asp.net?

Now, I will right the steps to encrypt the identity section in asp.net web.config file.
For this you must first open your command prompt and  navigate to your .net framework folder in your machine.

eg: C:\Windows\Microsoft.NET\Framework\v4.0.30319\


Now type the code below for encrypting the Identity section

aspnet_regiis -pef "system.web/identity" "D:\Smilu\Testing\WebserviceCalls"


To know what is aspnet_regiis tool go to the MSDN description of it.

Just a go through the code above

  • -pef - Will encrypt the section for you.
  • -pdf  - Will decrypt the section for you.
  • "system.web/identity" - The section which I need to encrypt
  • "D:\Smilu\Testing\WebserviceCalls" - The target web.config location in which i need to encrypt the data.

Let us see the web.config file before and after we run this command

Before Encrypting identity section in web.config

<identity impersonate="true" userName="domain\smilu" password="password"/>

Now after running the aspnet_regiis code on your command prompt

<identity configProtectionProvider="RsaProtectedConfigurationProvider">
 <EncryptedData Type="http://www.w3.org/2001/04/xmlenc#Element"
xmlns="http://www.w3.org/2001/04/xmlenc#">
 <EncryptionMethod Algorithm="http://www.w3.org/2001/04/xmlenc#tripledes-cbc" />
 <KeyInfo xmlns="http://www.w3.org/2000/09/xmldsig#">
 <EncryptedKey xmlns="http://www.w3.org/2001/04/xmlenc#">
 <EncryptionMethod Algorithm="http://www.w3.org/2001/04/xmlenc#rsa-1_5" />
 <KeyInfo xmlns="http://www.w3.org/2000/09/xmldsig#">
  <KeyName>Rsa Key</KeyName>
 </KeyInfo>
 <CipherData>
  <CipherValue>uY1Wq5ZRRoWTuaR/4Xlst6/c1Rm9usaweg24XPd4OdMrJ4NDEkgM0vqECs4aCDy8F8JYX+lqzYRDHhj0V4QiHd16UPLqaGGfkPTm/3v6NRqM1Gv7r1fm2Rjagrc1V/zACL8OYHs/42VpDNpeyqDuf/70LLfTAaHjF9EX/tGJPBRRLqwfozHCv0Qjnm3i5Miuk0u19POzmX7+FZYQcnXNwN5EgvGeOKs+7FJNkidBHK1rVsdvjacpMSDICID2DQKlnuRPyXtjCJgqqFUawRolYEOuJGWgDZPAB/H0Ca/cRW3Dif3hCuD6qIc/LqqQo+xZOdXoJ/QPmO5oqURXge9SyQ==</CipherValue>
 </CipherData>
</EncryptedKey>
</KeyInfo>
<CipherData>
 <CipherValue>zqM9DF/qBA04DKIZ/LfcNLjw8RVh6B+yimvxMF3p+UVW6KTaQS/2t0TvwfbRC5QjFFDWCZkM/4EZmmOtXlY773S+7z8DS4wFeTdeOQN1zctCmxypE8eNPQ==</CipherValue>
 </CipherData>
</EncryptedData>
</identity>
This is how it look when you encrypt the identity section. This section holds your username and password in an encrypted manner. If you can go through it you can find that here it has used RsaProtectedConfigurationProvider for encryption

So, This is how it is encrypted. Now, don't worry about how it works. Asp.net will decrypt it automatically when you are running the application.

Now, you are safe with your username and password as no one can read this.

Okay!! Now let me run the application.

Ohh god!  I met up with an error HTTP 500.19.

HTTP Error 500.19 - Configuration Section Encryption is Not Supported

Now, what you might be thinking? What is this guy talking about, He asked me to encrypt the section and now asp.net is saying encryption is not supported?

Don't worry when you see this error. You have a very simple fix for this.
Add this line of code to your web.config section. This time its not in the system.web section instead you must write the code in system.webserver section

<system.webServer>
   <validation validateIntegratedModeConfiguration="false" />
</system.webServer>
Now, when you run the application it will run without that error.

Here, I have gone though the steps and possible issues you will face when you are trying to upload a file into a network folder. Hope this will help you a lot in uploading the files using asp.net fileupload control

In the next topic i will tell you how to programatically do impersonation.

Happy programming!

Thursday, March 27, 2014

Working with FileUpload control and its errors in Asp.NET

I'm pretty sure you might be knowing how to work with the FileUpload control for uploading files.
I'm talking about the normal classic FileUpload control which is available with Visual Studio.

This is a tutorial in asp.net for working with FileUpload control.

This blog post shows you about

  1. How to upload a file using FileUpload control in asp.net
  2. Possible errors while uploading files into the  Webserver(IIS)
File upload controls can be used to upload any kind of file into a webserver or a desired location using ASP.NET

This is pretty very easy one.
Let me make it simple for you.

First, Create an ASP.NET application and keep a FileUpload control on it. let us say the name as FileUploadDocuments.


----------------------


Now place a button let say UPLOAD FILE near the FileUpload control


Now on the UploadFile_Click event write the code below


protected void UploadFileButton_Click(object sender, EventArgs e)
{
  FileUploadDocuments.SaveAs(@"C:\smilu\" + FileUploadDocuments.FileName);
}
    

Now, run your application. Select a file from your local machine. Click on the Upload button and that's it. Done!!

Go to the physical location and you can find the Uploaded file there. "C:\smilu\".

How, simple is it right?

Normally, I start like this. So, its easy for others to understand FileUploading. Now, you know which code actually uploads the file.

Now, We need to know much more things about the control to exactly upload the file with no errors or saving it from uploading virus scripts or anything.

So, what all things should be checked here. Let us say, I want my file size restricted to 10MB, only images, pdf, doc files should be uploaded, Whether the file is present in the physical location etc etc. So, how can I achieve this?


1) I want to upload the Files into a folder inside my website


Its always better to upload files into the same website subfolders since all the files will be available for you. But, there are cases like if its a big application you cannot go with this approach since there might be too much files getting uploaded. So, you can use a network path or a physical path to an external HDD etc.

Now, here we are talking about how to upload into a sub folder inside my website itself.
So, First create a folder inside your solution from Solution explorer.
steps:-
Right click on Solution->Add->NewFolder (in Visual Studio 2013)
Right Click on Solution->NewFolder (in Visual Studio 2010)
Let us say the name given to that folder is "UPLOADS"

Now I want to save the files into my uploads folder.
So, First i want to get the physical path of my Uploads folder. The physical path can be some thing like "C:\inetpub\wwwroot\website\uploads\"
But we don't know in the webserver where we are going to place the webiste. So, the location should be mapped dynamically into the website.
For getting the physical path of a website folder you can use the statement Server.MapPath.
So, change the fileUpload controls code to
 FileUploadDocuments.SaveAs(Server.MapPath("~/Uploads/") + FileUploadDocuments.FileName);

Here Server.MapPath("~/Uploads/") will get the physical path of the upload folder and allows the file to be uploaded into that particular folder.

2) Check whether the file is available in the physical location.


Why should we need this? I'm selecting a file from physical location right?
Yes, You are selecting a file from Physical location. But what if after your selection the file got removed and then you tried to upload the file?

So, we need to avoid this issue.
This can be cross checked by HasFile attribute of the FileUpload Control like

if (FileUploadDocuments.HasFile)
{
 FileUploadDocuments.SaveAs(@"C:\smilu\" + FileUploadDocuments.FileName);
}
else
{
 ErrorMessage.Text="The file does not exist in the physical path";

}


This ensures the file you are about to upload is physically present in the drive.

3) I want to restrict my file size to 10MB


Why should I check this?
If you doesn't check this your webserver or the location to which you are uploading will be soon filled with files. What if someone tries to upload files of 100MB each.

So, We need to make use of all the available options given by FileUpload control in asp.net
How can we achieve this?
We can achieve this easily with the help of properly called ContentLength. Content length will return the no of bytes of the file you are trying to upload. You can write the code like this.

if (FileUploadDocuments.PostedFile.ContentLength < ((1024 * 10) * 1024))
{
FileUploadDocuments.SaveAs(@"C:\smilu\" + FileUploadDocuments.FileName);
}
else
{
ErrorMessage.Text="Your file is more than 10MB";
}


I have done the calculation like (1024 * 10) * 1024) because 10MB means the value will be 10485760 bytes. So, when you don't know exact value you think like this. 1MB=1024KB, 1KB=1024bytes.


So above you restricted the user to upload files below 10 MB. So, when a user tries to upload a file above 10 MB you can show an error message

4) I want to upload only files with a specific type(PDF/JPG/DOCX)


Why you need this?
This is needed since your purpose will be a job application and no one should upload a Video as his CV. :-)
Definition is as simple as that.

Now, how can you achieve this.
You can achieve this in many ways. My way of achieving is with the help of FileInfo class from System.IO and the ContentType property of the FileUpload control itself.

The safest way is with the help of ContentType since no one can alter the file extension and upload a different file(Like an image with docx extension)

You can write the code like below.
if (FileUploadDocuments.PostedFile.ContentType.ToUpper() == "APPLICATION/PDF" || FileUploadDocuments.PostedFile.ContentType.ToUpper() == "IMAGE/JPG" )
{
FileUploadDocuments.SaveAs(@"C:\smilu\" + FileUploadDocuments.FileName);
}
else
{
ErrorMessage.Text = "Only PDF and JPG files are allowed";
}

The above code will allow only PDF, and JPG files to be uploaded into the application.

TIP: Try printing FileUploadDocuments.PostedFile.ContentType when you upload different type of files and you will get all the desired content types.

If you only want to check the extension of the file then go thorough this way

System.IO.FileInfo fi = new System.IO.FileInfo(FileUploadDocuments.FileName);
if (fi.Extension.ToUpper() == ".DOCX" || fi.Extension.ToUpper() == ".DOC")
{
  FileUploadDocuments.SaveAs(@"C:\smilu\" + FileUploadDocuments.FileName);
}
else
{
  ErrorMessage.Text = "Invalid document only DOC, DOCX files are allowed";
}

So, with the codes above you can upload a file in the safest way to your webserver.

Now, let us see how the final code looks like with all these validations.

protected void UploadFileButton_Click(object sender, EventArgs e)
 {
  System.IO.FileInfo fi = new System.IO.FileInfo(FileUploadDocuments.FileName);  
  if (FileUploadDocuments.HasFile)
  {
   if (FileUploadDocuments.PostedFile.ContentLength < ((1024 * 10) * 1024))
   {
    if (FileUploadDocuments.PostedFile.ContentType.ToUpper() == "APPLICATION/PDF" || FileUploadDocuments.PostedFile.ContentType.ToUpper() == "IMAGE/JPG" || fi.Extension.ToUpper() == ".DOCX" || fi.Extension.ToUpper() == ".DOC")
    {
     FileUploadDocuments.SaveAs(Server.MapPath("~/Uploads/") + FileUploadDocuments.FileName);
    }
    else
    {
     ErrorMessage.Text = "Only PDF/JPG/DOC/DOCX files are allowed";
    }
   }
   else
   {
    ErrorMessage.Text = "Your file is more than 10MB";
   }
  }
  else
  {
   ErrorMessage.Text = "The file does not exist in the physical path";
  }
}


Now, when you run this it will work smoothly until you put this into a real Webserver.

Handling Errors


What's going to happen when you put this into a webserver. If you are beginner and you are working with the file upload control it can make you crazy with the errors appearing in the webservers.
First one will be exception due to the permission level of the folder
Always make sure you have set the write permission of the folder to IIS_IUSRS of the webserver machine.


This will make sure that IIS users are allowed to write the files into the Uploads Folder. You just need to set the permission only for Uploads folder.


Now, Another error which you might have to face is the Max Request length reached error.
Whenever you try to upload a file above 4MB using FileUpload control into the Webserver, It will raise an error saying Max Request Length reached. This is because by default the max request length of our IIS setting is set to 4MB. when you get this error you must have to override the maxRequestLenth from web.config.
This can be done by adding a line of code in the web.config in the system.web section.

  <httpRuntime targetFramework="4.5.1" maxRequestLength="1024000" />
In most cases the above code alone should handle the exception.
But in some cases even if you write the above code again you might get the same error. So, this time you will be worried thinking what happened. This is because in a minor case sometimes IIS will look into system.weberver section also.
So, you must override this in the system.webserver section too. If you don't have the system.webserver section you must add it into the web.config file.


<system.webServer>    
    <security>
      <requestFiltering>
        <requestLimits maxAllowedContentLength="524288000"/>
      </requestFiltering>
    </security>
  </system.webServer>
Now, this must allow you to upload files upto 500MB of size.

So, have a great day. My next blog will be containing how to upload file into a network folder and what all thre problems that you will face in that. How to store files into a network folder with the help of Identity Impersonation, dynamic impersonation, Identity impersonation encryption etc.

If you are working with .NET Framework 4.0 sometimes even with all the above codes you might get an error "Page cannot be displayed".
So, if you face this error write the below code after the security section in System.webserver

<modules runAllManagedModulesForAllRequests="true"/>

Now, the website should work perfectly


Tuesday, March 27, 2012

Add SOAP Header to your XML WebService

This will show how to add a SOAP Header to a WebService.
//namespace
using System.Web.Services.Protocols;

Creating the Header.
Create a Class which is Inherited from SoapHeader Class.


public class UserAuthHeader : SoapHeader
{
public string UserName;
public string Password;
}


[WebService(Namespace = "http://www.smilu.net/")]
[WebServiceBinding(ConformsTo = WsiProfiles.BasicProfile1_1)]
// To allow this Web Service to be called from script, using ASP.NET AJAX, uncomment the following line.
// [System.Web.Script.Services.ScriptService]
public class Service : System.Web.Services.WebService
{
public UserAuthHeader userauthentication;
public Service () {

//Uncomment the following line if using designed components
//InitializeComponent();
}

[WebMethod,SoapHeader("userauthentication")]
public string HelloWorld() {
if (userauthentication.UserName == "smilu" && userauthentication.Password == "pass")
{
return "Hello World";
}
else
{
return "access denied";
}

}

}


-------------------------------------------------------------------------------------

For calling the same inside a Website check the code below

protected void Button1_Click(object sender, EventArgs e)
{
WithHeader.Service sc = new WithHeader.Service();
WithHeader.UserAuthHeader uh = new WithHeader.UserAuthHeader();
uh.UserName = "smilu";
uh.Password = "pass";
sc.UserAuthHeaderValue = uh;
Response.Write(sc.HelloWorld());
}

Here UserAuthHeader is the Class name of the Header which we created.

Wednesday, November 23, 2011

Dynamically create a Report in ReportViewer

Here im going to tell you about how to create a report using a report viewer by coding.

First you should create a typed DataSet with the structure of your Table(or how you need the table to be).
Now the next step is to create a report

Website/Project -> Add New Item -> Report
Give a name for it.
After this Select the Dataset from the New menu displayed in the rdlc file
The dataset will be diplayed in the report data window.
You must have to provide a Name for the dataset. In DataSource you will get the Typed DataSet you created.
Select the DataTable you created in the Dataset in the AvailableDatasets section and click OK.
Now, You will get the information in the left pane window.

Above you can see the Dataset added to the Table. Here the DataSet name given by me is DataSetSmilu. You should remember this name when we Bind the data from the program....

Now you can right click on the report create a table in the Report page and add the Fileds shown above like this.


Now you have the report file to be attached with the Report Viewer. You can add images, header etc to this page...

Now create a new WebForm.
From the ToolBox add a Ajax ScriptManager into the page
Now from the Reports Section add a Report Viewer into the page.
Select the ToolTip of the ReportViewer and Select the .rdlc file that you have created.

Now whenever you add a Report.rdlc file an ObjectDataSource will be added to the page. We dont need that objectdatasource for the working here...
So You can delete the ObjectDataSource.
Now you should go to Source of the Page and remove the ObjectDataSource Link on the LocalReport section of Reportviewer


        <rsweb:ReportViewer ID="ReportViewer1" runat="server" Font-Names="Verdana"
            Font-Size="8pt" InteractiveDeviceInfos="(Collection)"
            WaitMessageFont-Names="Verdana" WaitMessageFont-Size="14pt" Width="651px">
            <LocalReport ReportPath="rerportsmilu.rdlc">
                <DataSources>
                   <rsweb:ReportDataSource />
                </DataSources>
            </LocalReport>
         </rsweb:ReportViewer>

After editing the form should look like this.

Now to our coding part.
Goto your codebehind file. ie the .cs file of the page and bind the data to the dataset.


using System.Data.SqlClient;
using Microsoft.Reporting.WebForms;
using System.Web.Configuration;

//code in page load or some methods..

 smiluDS tDs = new smiluDS();
            SqlConnection con = new SqlConnection(WebConfigurationManager.ConnectionStrings["NationalBankConnectionString"].ConnectionString);
            SqlDataAdapter da = new SqlDataAdapter("Select * from Employee", con);
            da.Fill(tDs, tDs.Tables[0].TableName);


            ReportDataSource rDs = new ReportDataSource("DataSetSmilu", tDs.Tables[0]);
            ReportViewer1.LocalReport.DataSources.Clear();
            ReportViewer1.LocalReport.DataSources.Add(rDs);
            ReportViewer1.LocalReport.Refresh();
//code complete

In the above code the We are using a SqlDataAdapter to get the data.
Now since we are using a TypedDataSet you should create an instance of the TypedDataSet itself.. Here it is smiluDS. Now  a ReportDataSource should be created for the reportviewer. In the report viewer we should specify the DataSet which we have created in the RDLC file and data to be Binded into it..

Try to run it.. you will get the d


Monday, November 21, 2011

VB to C# Application Path in WindowsService

This method in VB.NET can be written like the below reflection method. The below method gets you the location of your application
My.Application.Info.DirectoryPath


System.Reflection.Assembly.GetExecutingAssembly().Location;

Tuesday, August 31, 2010

Insertion Using Entity Model


This is the Entity data Model NationalBankEntities3 in the program.
We are going to add Items into the table EmployeeDetail

Now we must write the code like below

NationalBankModel3.NationalBankEntities3 m = new NationalBankModel3.NationalBankEntities3();
NationalBankModel3.EmployeeDetail Emp = new NationalBankModel3.EmployeeDetail() { EmpName = "Smilu", EmpAddress = "EKM", EmpPhNo = "987654", EmpDob =Convert.ToDateTime("01/01/01") };

m.AddToEmployeeDetails(Emp);
m.SaveChanges();

Here AddToEmployeeDetails will be the method which will insert the data of the Entity we send.
SaveChages() will store the data into the table

Tuesday, August 10, 2010

Linq to XML

Here we are just going to see how we can associate XML with LinQ.

First create an XML file with the structure like this CLICK HERE

Now add a GridView to your design.

We need

System.Xml.Linq;

namespace for working of XLINQ

Now in the page load event add the code like this..
------------------------------------------------------
var query = from s in XElement.Load(MapPath("Students.xml")).Elements("Student1")
select new
{
Name = (string)s.Element("StName"),
Address = (string)s.Element("StAddress"),
PhNo = (string)s.Element("StPHNO"),
flag = (int)s.Element("Flag")
};

GridView1.DataSource=query;
GridView1.DataBind();
------------------------------------------------------
In the above code we are using XElement.Load method to Load the Students.xml file and we must mention the Node inside which we have put the informations.

(string)s.Element("StName")
The above method converts the data inside the Node to the type we have specified and stores into it....
When we execute it we will get a GridView which contains columns Name, Address, PhNo, and Flag..