I'm pretty sure you might be knowing how to work with the FileUpload control for uploading files.
I'm talking about the normal classic FileUpload control which is available with Visual Studio.
This is a tutorial in asp.net for working with FileUpload control.
This blog post shows you about
----------------------
Now place a button let say UPLOAD FILE near the FileUpload control
Now, run your application. Select a file from your local machine. Click on the Upload button and that's it. Done!!
Go to the physical location and you can find the Uploaded file there. "C:\smilu\".
How, simple is it right?
Normally, I start like this. So, its easy for others to understand FileUploading. Now, you know which code actually uploads the file.
Now, We need to know much more things about the control to exactly upload the file with no errors or saving it from uploading virus scripts or anything.
So, what all things should be checked here. Let us say, I want my file size restricted to 10MB, only images, pdf, doc files should be uploaded, Whether the file is present in the physical location etc etc. So, how can I achieve this?
Its always better to upload files into the same website subfolders since all the files will be available for you. But, there are cases like if its a big application you cannot go with this approach since there might be too much files getting uploaded. So, you can use a network path or a physical path to an external HDD etc.
Now, here we are talking about how to upload into a sub folder inside my website itself.
So, First create a folder inside your solution from Solution explorer.
steps:-
Right click on Solution->Add->NewFolder (in Visual Studio 2013)
Right Click on Solution->NewFolder (in Visual Studio 2010)
Let us say the name given to that folder is "UPLOADS"
Now I want to save the files into my uploads folder.
So, First i want to get the physical path of my Uploads folder. The physical path can be some thing like "C:\inetpub\wwwroot\website\uploads\"
But we don't know in the webserver where we are going to place the webiste. So, the location should be mapped dynamically into the website.
For getting the physical path of a website folder you can use the statement Server.MapPath.
So, change the fileUpload controls code to
Here Server.MapPath("~/Uploads/") will get the physical path of the upload folder and allows the file to be uploaded into that particular folder.
Why should we need this? I'm selecting a file from physical location right?
Yes, You are selecting a file from Physical location. But what if after your selection the file got removed and then you tried to upload the file?
So, we need to avoid this issue.
This can be cross checked by HasFile attribute of the FileUpload Control like
This ensures the file you are about to upload is physically present in the drive.
Why should I check this?
If you doesn't check this your webserver or the location to which you are uploading will be soon filled with files. What if someone tries to upload files of 100MB each.
So, We need to make use of all the available options given by FileUpload control in asp.net
How can we achieve this?
We can achieve this easily with the help of properly called ContentLength. Content length will return the no of bytes of the file you are trying to upload. You can write the code like this.
I have done the calculation like (1024 * 10) * 1024) because 10MB means the value will be 10485760 bytes. So, when you don't know exact value you think like this. 1MB=1024KB, 1KB=1024bytes.
So above you restricted the user to upload files below 10 MB. So, when a user tries to upload a file above 10 MB you can show an error message
Why you need this?
This is needed since your purpose will be a job application and no one should upload a Video as his CV. :-)
Definition is as simple as that.
Now, how can you achieve this.
You can achieve this in many ways. My way of achieving is with the help of FileInfo class from System.IO and the ContentType property of the FileUpload control itself.
The safest way is with the help of ContentType since no one can alter the file extension and upload a different file(Like an image with docx extension)
You can write the code like below.
The above code will allow only PDF, and JPG files to be uploaded into the application.
TIP: Try printing FileUploadDocuments.PostedFile.ContentType when you upload different type of files and you will get all the desired content types.
If you only want to check the extension of the file then go thorough this way
So, with the codes above you can upload a file in the safest way to your webserver.
Now, let us see how the final code looks like with all these validations.
Now, when you run this it will work smoothly until you put this into a real Webserver.
What's going to happen when you put this into a webserver. If you are beginner and you are working with the file upload control it can make you crazy with the errors appearing in the webservers.
First one will be exception due to the permission level of the folder
Always make sure you have set the write permission of the folder to IIS_IUSRS of the webserver machine.
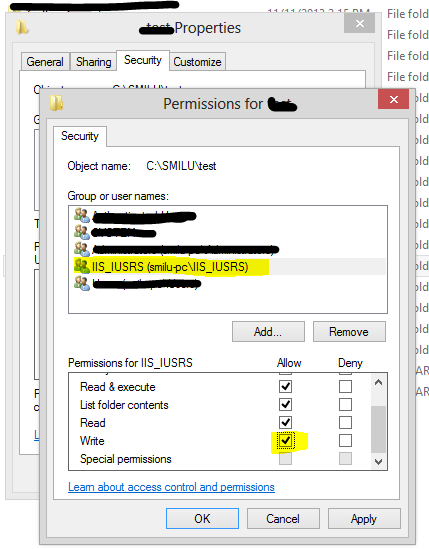
This will make sure that IIS users are allowed to write the files into the Uploads Folder. You just need to set the permission only for Uploads folder.
Now, Another error which you might have to face is the Max Request length reached error.
Whenever you try to upload a file above 4MB using FileUpload control into the Webserver, It will raise an error saying Max Request Length reached. This is because by default the max request length of our IIS setting is set to 4MB. when you get this error you must have to override the maxRequestLenth from web.config.
This can be done by adding a line of code in the web.config in the system.web section.
But in some cases even if you write the above code again you might get the same error. So, this time you will be worried thinking what happened. This is because in a minor case sometimes IIS will look into system.weberver section also.
So, you must override this in the system.webserver section too. If you don't have the system.webserver section you must add it into the web.config file.
So, have a great day. My next blog will be containing how to upload file into a network folder and what all thre problems that you will face in that. How to store files into a network folder with the help of Identity Impersonation, dynamic impersonation, Identity impersonation encryption etc.
If you are working with .NET Framework 4.0 sometimes even with all the above codes you might get an error "Page cannot be displayed".
So, if you face this error write the below code after the security section in System.webserver
Now, the website should work perfectly
I'm talking about the normal classic FileUpload control which is available with Visual Studio.
This is a tutorial in asp.net for working with FileUpload control.
This blog post shows you about
- How to upload a file using FileUpload control in asp.net
- Possible errors while uploading files into the Webserver(IIS)
File upload controls can be used to upload any kind of file into a webserver or a desired location using ASP.NET
This is pretty very easy one.
Let me make it simple for you.
First, Create an ASP.NET application and keep a FileUpload control on it. let us say the name as FileUploadDocuments.
----------------------
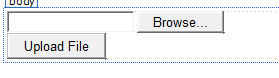
Now place a button let say UPLOAD FILE near the FileUpload control
 |
Now on the UploadFile_Click event write the code below
protected void UploadFileButton_Click(object sender, EventArgs e)
{
  FileUploadDocuments.SaveAs(@"C:\smilu\" + FileUploadDocuments.FileName);
}
Now, run your application. Select a file from your local machine. Click on the Upload button and that's it. Done!!
Go to the physical location and you can find the Uploaded file there. "C:\smilu\".
How, simple is it right?
Normally, I start like this. So, its easy for others to understand FileUploading. Now, you know which code actually uploads the file.
Now, We need to know much more things about the control to exactly upload the file with no errors or saving it from uploading virus scripts or anything.
So, what all things should be checked here. Let us say, I want my file size restricted to 10MB, only images, pdf, doc files should be uploaded, Whether the file is present in the physical location etc etc. So, how can I achieve this?
1) I want to upload the Files into a folder inside my website
Its always better to upload files into the same website subfolders since all the files will be available for you. But, there are cases like if its a big application you cannot go with this approach since there might be too much files getting uploaded. So, you can use a network path or a physical path to an external HDD etc.
Now, here we are talking about how to upload into a sub folder inside my website itself.
So, First create a folder inside your solution from Solution explorer.
steps:-
Right click on Solution->Add->NewFolder (in Visual Studio 2013)
Right Click on Solution->NewFolder (in Visual Studio 2010)
Let us say the name given to that folder is "UPLOADS"
Now I want to save the files into my uploads folder.
So, First i want to get the physical path of my Uploads folder. The physical path can be some thing like "C:\inetpub\wwwroot\website\uploads\"
But we don't know in the webserver where we are going to place the webiste. So, the location should be mapped dynamically into the website.
For getting the physical path of a website folder you can use the statement Server.MapPath.
So, change the fileUpload controls code to
FileUploadDocuments.SaveAs(Server.MapPath("~/Uploads/") + FileUploadDocuments.FileName);
Here Server.MapPath("~/Uploads/") will get the physical path of the upload folder and allows the file to be uploaded into that particular folder.
2) Check whether the file is available in the physical location.
Why should we need this? I'm selecting a file from physical location right?
Yes, You are selecting a file from Physical location. But what if after your selection the file got removed and then you tried to upload the file?
So, we need to avoid this issue.
This can be cross checked by HasFile attribute of the FileUpload Control like
if (FileUploadDocuments.HasFile)
{
 FileUploadDocuments.SaveAs(@"C:\smilu\" + FileUploadDocuments.FileName);
}
else
{
 ErrorMessage.Text="The file does not exist in the physical path";

}
This ensures the file you are about to upload is physically present in the drive.
3) I want to restrict my file size to 10MB
Why should I check this?
If you doesn't check this your webserver or the location to which you are uploading will be soon filled with files. What if someone tries to upload files of 100MB each.
So, We need to make use of all the available options given by FileUpload control in asp.net
How can we achieve this?
We can achieve this easily with the help of properly called ContentLength. Content length will return the no of bytes of the file you are trying to upload. You can write the code like this.
if (FileUploadDocuments.PostedFile.ContentLength < ((1024 * 10) * 1024))
{
FileUploadDocuments.SaveAs(@"C:\smilu\" + FileUploadDocuments.FileName);
}
else
{
ErrorMessage.Text="Your file is more than 10MB";
}
I have done the calculation like (1024 * 10) * 1024) because 10MB means the value will be 10485760 bytes. So, when you don't know exact value you think like this. 1MB=1024KB, 1KB=1024bytes.
So above you restricted the user to upload files below 10 MB. So, when a user tries to upload a file above 10 MB you can show an error message
4) I want to upload only files with a specific type(PDF/JPG/DOCX)
Why you need this?
This is needed since your purpose will be a job application and no one should upload a Video as his CV. :-)
Definition is as simple as that.
Now, how can you achieve this.
You can achieve this in many ways. My way of achieving is with the help of FileInfo class from System.IO and the ContentType property of the FileUpload control itself.
The safest way is with the help of ContentType since no one can alter the file extension and upload a different file(Like an image with docx extension)
You can write the code like below.
if (FileUploadDocuments.PostedFile.ContentType.ToUpper() == "APPLICATION/PDF" || FileUploadDocuments.PostedFile.ContentType.ToUpper() == "IMAGE/JPG" )
{
FileUploadDocuments.SaveAs(@"C:\smilu\" + FileUploadDocuments.FileName);
}
else
{
ErrorMessage.Text = "Only PDF and JPG files are allowed";
}
The above code will allow only PDF, and JPG files to be uploaded into the application.
TIP: Try printing FileUploadDocuments.PostedFile.ContentType when you upload different type of files and you will get all the desired content types.
If you only want to check the extension of the file then go thorough this way
System.IO.FileInfo fi = new System.IO.FileInfo(FileUploadDocuments.FileName);
if (fi.Extension.ToUpper() == ".DOCX" || fi.Extension.ToUpper() == ".DOC")
{
  FileUploadDocuments.SaveAs(@"C:\smilu\" + FileUploadDocuments.FileName);
}
else
{
  ErrorMessage.Text = "Invalid document only DOC, DOCX files are allowed";
}
So, with the codes above you can upload a file in the safest way to your webserver.
Now, let us see how the final code looks like with all these validations.
protected void UploadFileButton_Click(object sender, EventArgs e)
 {
  System.IO.FileInfo fi = new System.IO.FileInfo(FileUploadDocuments.FileName);
  if (FileUploadDocuments.HasFile)
  {
   if (FileUploadDocuments.PostedFile.ContentLength < ((1024 * 10) * 1024))
   {
    if (FileUploadDocuments.PostedFile.ContentType.ToUpper() == "APPLICATION/PDF" || FileUploadDocuments.PostedFile.ContentType.ToUpper() == "IMAGE/JPG" || fi.Extension.ToUpper() == ".DOCX" || fi.Extension.ToUpper() == ".DOC")
    {
     FileUploadDocuments.SaveAs(Server.MapPath("~/Uploads/") + FileUploadDocuments.FileName);
    }
    else
    {
     ErrorMessage.Text = "Only PDF/JPG/DOC/DOCX files are allowed";
    }
   }
   else
   {
    ErrorMessage.Text = "Your file is more than 10MB";
   }
  }
  else
  {
   ErrorMessage.Text = "The file does not exist in the physical path";
  }
}
Now, when you run this it will work smoothly until you put this into a real Webserver.
Handling Errors
What's going to happen when you put this into a webserver. If you are beginner and you are working with the file upload control it can make you crazy with the errors appearing in the webservers.
First one will be exception due to the permission level of the folder
Always make sure you have set the write permission of the folder to IIS_IUSRS of the webserver machine.
This will make sure that IIS users are allowed to write the files into the Uploads Folder. You just need to set the permission only for Uploads folder.
Now, Another error which you might have to face is the Max Request length reached error.
Whenever you try to upload a file above 4MB using FileUpload control into the Webserver, It will raise an error saying Max Request Length reached. This is because by default the max request length of our IIS setting is set to 4MB. when you get this error you must have to override the maxRequestLenth from web.config.
This can be done by adding a line of code in the web.config in the system.web section.
<httpRuntime targetFramework="4.5.1" maxRequestLength="1024000" />In most cases the above code alone should handle the exception.
But in some cases even if you write the above code again you might get the same error. So, this time you will be worried thinking what happened. This is because in a minor case sometimes IIS will look into system.weberver section also.
So, you must override this in the system.webserver section too. If you don't have the system.webserver section you must add it into the web.config file.
<system.webServer>
    <security>
      <requestFiltering>
        <requestLimits maxAllowedContentLength="524288000"/>
      </requestFiltering>
    </security>
  </system.webServer>
Now, this must allow you to upload files upto 500MB of size.So, have a great day. My next blog will be containing how to upload file into a network folder and what all thre problems that you will face in that. How to store files into a network folder with the help of Identity Impersonation, dynamic impersonation, Identity impersonation encryption etc.
If you are working with .NET Framework 4.0 sometimes even with all the above codes you might get an error "Page cannot be displayed".
So, if you face this error write the below code after the security section in System.webserver
<modules runAllManagedModulesForAllRequests="true"/>
Now, the website should work perfectly
No comments:
Post a Comment